
Mounting a dedicated disk in WSL2
In WSL2, the default disks are virtual. Microsoft has recently added support for mapping physical disks to your WSL2 VM. I was running low on space my C: drive, so I wanted to move some of my WSL2 data to a dedicated Linux drive.
In WSL2, the default disks are virtual. Microsoft has recently added support for mapping physical disks to your WSL2 VM. I was running low on space my C: drive, so I wanted to move some of my WSL2 data to a dedicated Linux drive.
If you're using the Ubuntu from the App Store, the default virtual disk image is somewhere like %LocalAppData%\Packages\CanonicalGroupLimited.UbuntuonWindows_*\LocalState\ext4.vhdx
I have a drive on my system that I wanted to dedicate to wsl. So I used "wsl --mount \\.\PHYSICALDRIVE1 --bare" in an administrator powershell terminal.
Then I was able to locate it with lsblk in the WSL vm, and I partitioned and formatted it.
The mount command is not persistent, so I needed a way to automatically mount the drive.
I created a shell script to run as administrator and attach the drive to the VM. I had originally tried to have Linux mount the drive in this shell script, but that didn't work as expected.
WSL2 is setup with different filesystem namespaces depending on which user started the process. This lets you change Windows system files under WSL2. For example:

The Windows system files permissions show up differently between Windows admin and normal user:

You can also see evidence of these two filesystem namespaces in the mountinfo file:

From the first column of both lines, you can see that they're different mounts (mount ID 77 vs 38). This means that when I mounted the filesystem in my shell script, it applied to the admin user Linux context, and does not show up in the normal user Linux context.
So I had to split my wsl startup script into two parts:
- attach the physical drive to WSL as an admin user
- mount the drive as a normal user
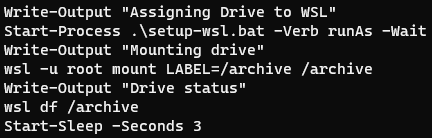
The powershell script runs the batch script as Administrator, waits for that to finish, and then mounts the drive in the user filesystem namespace.
The batch script shuts down any running wsl processes, attaches the drive to the WSL VM, and then sets the Windows hosts file (with the set-windows-hosts script above).

Cleanup step
After moving a few gigs around, I noticed that the vhdx file wasn't any smaller. The workaround is to run the diskpart command to compact the virtual disk.
After all this, now I have more storage on my Linux VM and more free space on my C: drive!
Questions? Comments? Contact information